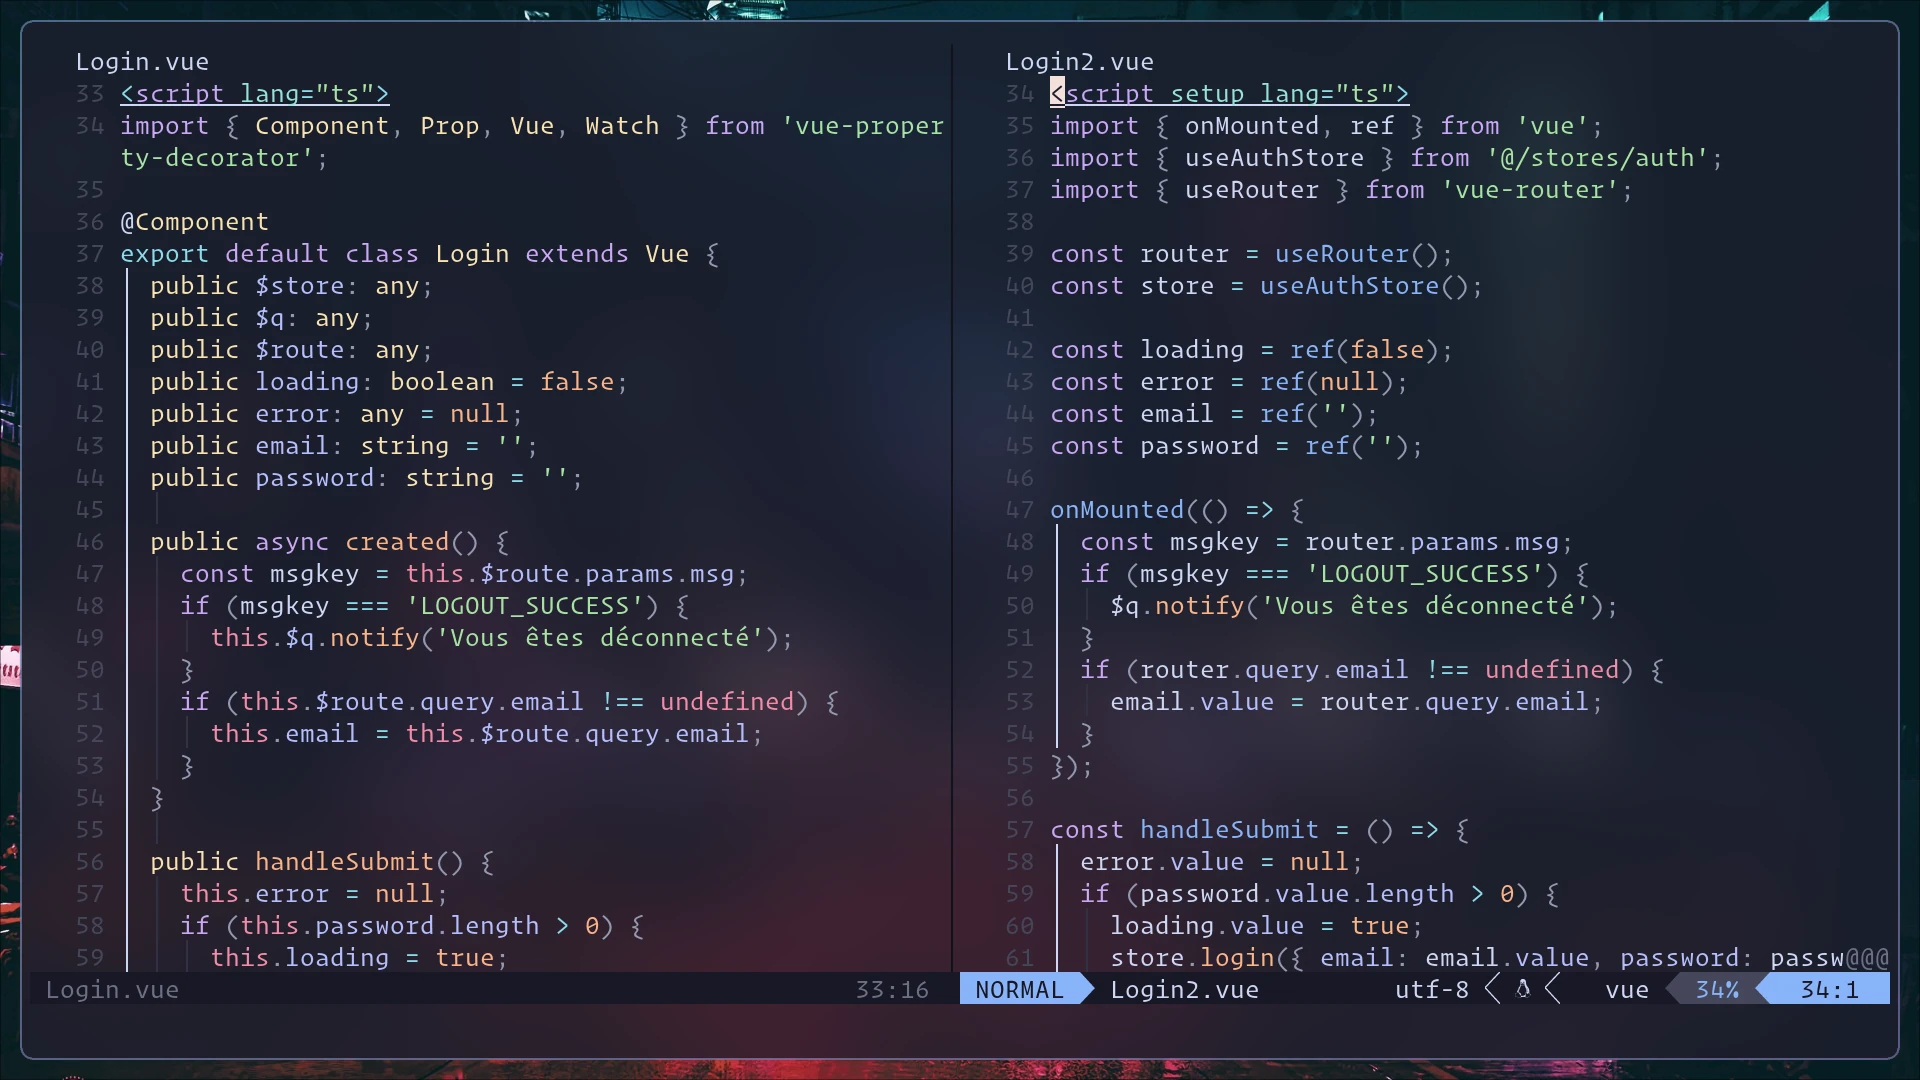
NPOT textures support in OpenGL

If you already done OpenGL development, you should be aware of POT (Power of two) texture. Because of very old conventions, the texture size must be a power of two size. Not necessarily the same for width and height though : 256×256 is valid as 128×512.

The usual thing to do when you want to load an NPOT texture (like 23×61) is to:

  • take his closed POT size: 32×64
  • depending of the book you’re reading: blit/strech the 23×61 to the 32×64 texture
  • OR blit without stretch, and adjust texture coordinate (this is what kivy does right now.)

The downside part of this approach is that you’re lost a part of memory. Bad.

While ago, i remember to found the Rectangle texture support from NVidia. Aaah, finally, is it what we was waiting from a long time ? Erm, no. Their implementation have lot of downsides:

  • The usage of a specific texture target: GL_TEXTURE_RECTANGLE_NV
  • No mipmap support
  • The texture coordinates are not normalized from 0-1… but from 0-width/height of the image
  • Some wrap mode are not supported (GL_REPEAT for eg.)

But today… i discover that most graphics card are supporting rectangle texture. If the extension GL_ARB_texture_non_power_of_two (OES_texture_npot for OpenGL ES platform), you can finally ensure that loading NPOT texture will… just work as expected :

  • You can still use GL_TEXTURE_2D
  • Mipmapping are supported
  • Texture coordinates are from 0-1
  • All wrap mode are supported

A little note here, in OpenGL ES 2, they have a native support for NPOT texture, but with somes limitations related to mipmapping.

If you want to just load NPOT texture safely without using rectangle texture, just check the availability of theses extensions :

extensions = glGetString(GL_EXTENSIONS).split()
npot_support = ('OES_texture_npot' in extensions or \
                'GL_ARB_texture_non_power_of_two' in extensions)

Using microphone peak as input

I’m currently on a project that involve disabled peoples, audio and kinect. Theses boys and girls are doing lot of loud sounds, so the idea is to use their sound as a trigger. We can use gstreamer to make that work quite easily, cause it have everything we need: a audio source, and level calculator.

import pygst
pygst.require('0.10')
import gst, gobject
gobject.threads_init()
 
pipeline = gst.parse_launch(
    'pulsesrc ! audioconvert ! '
    'audio/x-raw-int,channels=2,rate=44100,endianness=1234,'
    'width=32,depth=32,signed=(bool)True !'
    'level name=level interval=10000000 !'
    'fakesink')
 
level = pipeline.get_by_name('level')
bus = pipeline.get_bus()
bus.add_signal_watch()
 
def show_peak(bus, message):
    # filter only on level messages
    if message.src is not level:
        return
    if not message.structure.has_key('peak'):
        return
    # read peak
    print 'peak', message.structure['peak'][0]
 
# connect the callback
bus.connect('message', show_peak)
 
# start the pipeline
pipeline.set_state(gst.STATE_PLAYING)
 
ctx = gobject.gobject.main_context_default()
while ctx:
    ctx.iteration()

The output could be something like this :

peak -35.2370719856
peak -35.0252114393
peak -10.8591229158
peak -4.6007387433
peak -4.85102463679
peak -6.45292575653
peak -6.83102903668
peak -7.39486319074
peak -13.9852340247
peak -17.423901433
peak -35.0852178272
peak -35.8725208237

Next, we can use that information to record their sound, and use it on some scenario. So, instead of use the fakesink, we can use appsink. This module allow you to read the buffer pushed by the previous module. So we can put theses buffers into a list, and use them when needed :)

The state machine will handle the 3 phases :

  1. Wait for a peak > -30db
  2. Recording the sound, stop when the peak is < -32db
  3. Replay the last sound

Note: The -30 / -32 are taken from my tests. If you have more noise, you need to adjust theses triggers.

And here is the final example:

import pygst
pygst.require('0.10')
import gst, gobject
gobject.threads_init()
 
pipeline_play = None
pipeline = gst.parse_launch(
    'pulsesrc ! audioconvert ! '
    'audio/x-raw-int,channels=2,rate=44100,endianness=1234,'
    'width=32,depth=32,signed=(bool)True !'
    'level name=level interval=10000000 !'
    'appsink name=app emit-signals=True')
 
state = 'wait'
peak = -99
buffers = []
level = pipeline.get_by_name('level')
app = pipeline.get_by_name('app')
bus = pipeline.get_bus()
bus.add_signal_watch()
 
def show_peak(bus, message):
    global peak
    # filter only on level messages
    if message.src is not level:
        return
    if not message.structure.has_key('peak'):
        return
    # read peak
    peak = message.structure['peak'][0]
 
def enqueue_audio_buffer(app):
    buffers.append(str(app.emit('pull-buffer')))
 
def play_sample(sample):
    global pipeline_play
    with open('audio.dat', 'wb') as fd:
        fd.write(sample)
    if pipeline_play is None:
        pipeline_play = gst.parse_launch(
            'filesrc location=audio.dat !'
            'audio/x-raw-int,channels=2,rate=44100,endianness=1234,'
            'width=32,depth=32,signed=(bool)True !'
            'audioamplify amplification=2 ! autoaudiosink')
    pipeline_play.set_state(gst.STATE_NULL)
    pipeline_play.set_state(gst.STATE_PLAYING)
 
# connect the callback
bus.connect('message', show_peak)
app.connect('new-buffer', enqueue_audio_buffer)
 
# start the pipeline
pipeline.set_state(gst.STATE_PLAYING)
 
# main loop
ctx = gobject.gobject.main_context_default()
while ctx:
    ctx.iteration()
    print state, peak
 
    # wait for somebody to make a sound
    if state == 'wait':
        if peak > -30:
            state = 'record'
            continue
        # discard any buffer
        buffers = []
 
    # record the current audio, until the peak is going down
    elif state == 'record':
        if peak < -32:
            state = 'replay'
            continue
 
    # replay last sound
    elif state == 'replay':
        play_sample(''.join(buffers))
        state = 'wait'

Usage: Just make a sound… and it will replay just after.

Kivy on Android, part 2

Hi guys,

Look like people are following my blog and waiting for android version of Kivy.
We have a launcher that you can already use. Check the :

Maybe during the next release, or a little bit after, i’ll release a software to create an Android package of a Kivy application. The code is already on launchpad, but it’s still a work in progress. As soon as i have finished, i’ll publish it on kivy-dev mailing list. If you didn’t subscribe yet, do it now ! :)

More to come by the end of that week… !

Kivy (next PyMT) on Android, step 1 done !

Tonight is a wonderful night.

I know that i didn’t announce Kivy officially yet, but i’ll do it in another blog post very soon. You just need to know that Kivy is the next PyMT version. From 2 years ago with thomas, we have regulary doubts and reflections about using Python for PyMT. And i’ve started to look more at the future, and i was deeply convince that for our sake, we must be able to run on a Webbrowser. The goal is simple: same code for every platform, at least what we use every day: Linux / Windows / Macosx / Android / iOS.

Android and iOS are new OS, and we was thinking that except running in webbrowser, we will be never able to run on it. And we have started to target a futur with fewer dependencies, OpenGL ES 2.0 compatible, and so on. This vision have been named Kivy. Theses last days, i’ve removed numpy and pyopengl dependencies. Pygame is the only library required for running an application with widgets. (minimal don’t mean full featured).

And i’ve started to look at the android platform, since Tom from Renpy library have deliver a pygame subset for android. He just made an awesome work. My part was just to understand how it work, and get Kivy compilation done.

For now, here is what i’ve got :

Ok, but what i got exactly ?

  • Python/Pygame running from renpytom project
  • Failed attempt to use numpy on android
  • Kivy adapation for android (opengl debug mode, removing numpy and pyopengl, link on opengl es 2.0…)
  • Pygame change to create OpenGL ES 2.0
  • Various patch on the build system

And here is my step 2 :

  • Send to upstream all the patch on the build system
  • Resolve symbol conflict when 2 compiled module have the same name (kivy.event and pygame.event… nice naming.)
  • Add a way of detecting Android platform from python
  • Add multitouch support to pygame and/or kivy
  • Add android sleep/wakeup in kivy
  • Write documentation about how to compile a kivy application on android

For now, sleep time ! Enjoy.

Receiving SMS in python, for cheap.

From few month now, i was using my android phone to transmit new SMS to my computer using Android Notifier. All the new SMS was sent over Wifi/UDP. Now i was searching a standalone and cheap alternative. Recently, Hack a Day have published an article: Cheap and easy SMS via GMS for your MCU. And they talk about something very interesting: a USB GSM modem for only $25.

To be able to use this modem, i need also a SIM card. You have lot of possibilities to explore, but the one i’ve take is a prepaid card on Bouygues, for only 9.90€. You have only 5 minutes for dialing.. but you don’t care. What you must care about is the availability of the phone number. On this case, the number is still available 6 month. 9.90€ for having a 6 month number, that’s totally enough for only receiving SMS.

The GSM modem is internally a BenQ M23 (Specifications). You can use a simple serial command line to talk with :

$ cu -l /dev/ttyUSB0
Connected.
AT
OK
AT+CGMI
BenQ

OK
AT+CGMM
M32

OK
AT+CGMR
SW ver: 1.80
HW ver: 1.00
FS ver: 1.00
Build Date: 2004/6/25
Build Time: 18:40:37

OK

After exploring some documentation and specifications, what i found out:

  • Messaging system can be read in 2 form, text and PDU
  • Text mode is not ok for our French encoding. All specials characters are stripped.

Exemple of a session in text mode (AT+CMGF=1) :

AT+CMGF=1
OK
AT+CMGL="ALL"
+CMGL: 1,"REC UNREAD","336XXXXXXXXX",,"11/01/07,12:15:53+04",145,21
Voici les rsultats. 

OK

The correct word must be “résultats”, not “rsultats”. When switching to PDU mode (AT+CMGF=0), we obtain :

AT+CMGF=0
OK
AT+CMGL=4
+CMGL: 1,1,,38
07913306093076F0040B913386654329F100001110702151354015D6777A9C06B1CB7390BC30AFB3E961FADC0502

OK

The big hexadecimal string is the PDU. For decoding this string, we can use the Python Messaging library, very simple to use :

from messaging.sms import SmsDeliver
print SmsDeliver(
    '07913306093076F0040B913386654329F10000111070'
    '2151354015D6777A9C06B1CB7390BC30AFB3E961FADC0502').text
# output => u'Voici les r\xe9sultats. '

Here we are !

Next blog post: how to read MMS from Bouygues Telecom :)

PyMT used in Fourvière Museum

Last week, the Museotouch project have been inaugurated in the Fourvière Museum. The project have been done by many actors including Erasme and Mucho-Media.

One part of this project is a multitouch application to explore museum content. You can select the origin, the period/era, and you have museum content display on the table. Then you can select each of them to have more information.
As an user, you have another way to communicate with the application : when you come into that museum, they give you an badge with rfid inside. Walk in the museum, use your badge to “save” the object and then, put your badge on the table to explore what you have selected.
You can read the Erasme Museotouch page for more information, and see the Museotouch photos.

This application has been developed by Nadège Bourguignon :)

Joojoo and multitouch on Ubuntu 10.10

Hi everyone,

Some people are asking how to make multitouch working on joojoo. It’s now possible, starting from Ubuntu 10.10 + some manipulations.

Utouch ppa

The working drivers for joojoo wasn’t finished and ready for ubuntu 10.10 release. However, the driver is available from the utouch-team ppa. So add the ppa :

sudo add-apt-repository ppa:utouch-team/utouch
sudo apt-get update

And then, install the driver :

sudo apt-get install hid-egalax-dkms

The drivers should compile in live, and will be available in the next reboot. But don’t reboot now, we have more things to do.
But i got some troubles with default drivers, the dkms one don’t load if the old driver still exist.
So, ensure you have no other drivers in your /lib/modules :

$ sudo rm /lib/modules/2.6.35/kernel/drivers/hid/hid-egalax.ko
$ sudo depmod -a

udev rules

The joojoo screen have never the same /dev/input/eventX, and change from time to time. And it’s not readable by users.
We will create an udev rule to change permission, and symlink the /dev/input/eventX to /dev/input/event-joojoo

$ sudo gedit /etc/udev/rules.d/80-joojoo.rules

And put this content in the file :

SUBSYSTEM=="input", ATTRS{idVendor}=="0eef", ATTRS{idProduct}=="720c", MODE="0644", SYMLINK="input/event-joojoo"

Reboot.

You should have your screen correctly working with one finger.

PyMT

If you want to test multitouch, you can test PyMT :

$ sudo apt-get install python-pymt

Launch pymt one time, and hit escape :

$ python -m pymt.tools.demo

Edit the configuration file ~/.pymt/config and add in [input] section :

[input]
joojoo = mtdev,/dev/input/event-joojoo
# And comment tuio and mouse input
# mouse = mouse
# default = tuio,0.0.0.0:3333

Then, you can test rapid demo or full desktop :

# rapid demo
$ python -m pymt.tools.demo -a

# full desktop
$ python /usr/share/pymt-examples/desktop/desktop-multi.py -a

Using pymt-dev version

If you are using pymt-dev version from github, they are new features to make joojoo experience more fun :

Disable mouse on activity

If you still want to use the mouse, but not the mouse when the touchscreen is used, you may want this feature. It will automaticly disable the mouse when touchscreen is used. Just change your [input] section to :

[input]
mouse = mouse,disable_on_activity

Sleeping when no activity detected

This is highly experimental: sleep module. If you will not touch the screen from a moment, the sleep module will introduce a sleep() call inside the main loop, in order to reduce the framerate. The sleep ramp and time can be configured. Check the sleep module documentation.

To activate it, put in ~/.pymt/config :

[modules]
sleep =

Conclusion

That’s all. The Xorg is missing right now, it will be added soon :)

PyMT -to javascript-, the end.

As planned in september, i’ve explored how PyMT can be translated in javascript, using Pyjamas project. All is possible, and this translation could be possible, but i will need more than 2 week actually. It’s more like 4 month. Let’s check in details…

Pyjamas… not fully compatible Python !

Pyjamas don’t actually support :

  1. tuple construction (for x, y in tuplelist / for x, y in zip(a[::2], a[1::2]))
  2. with keyword with custom class (actively used in PyMT, gx_matrix, gx_begin…)
  3. Preprocessing. It would be very nice if we can have a way to NOT parse python, and not resolve all input. Like #ifdef / #endif in C. For example, it touch providers, we are testing if the system is linux, mac or windows to include the good input providers. But Pyjamas don’t care about if, since it’s a python translator. And then it will try to convert Windows part.)

Numpy

When the scatter widget have been rewritten, we have focusing about performance. All the math are now depend of Numpy. A fully C/Python library. For translation, we should write all the part we are using in a pure javascript library.

pyOpenGL / graphx

Same as Numpy, we are using OpenGL everywhere. pyOpenGL is performant when we are using contiguous array. That’s also why we are using Numpy when passing data to OpenGL.
But the most important is.. that all our call right now is not compatible WebGL.

As defined on the Kronos website, WebGL is based on the OpenGL ES 2.0 API. Direct rendering is not available on the OpenGL ES subset (glBegin/glEnd/glVertex…). Our entire graphx package, and all our widgets need to be rewritten.

And you know what ? We are moving to our new graphics package for the next PyMT version. But it will not resolve the issue because the new graphics package are written… in Cython, a C/Python language. Not compatible with Pyjamas so.

So after the move, the graphics library should be also completely rewritten for Javascript.

Core providers

I didn’t reach this part. The goal would be to create a Javascript platform for every providers, and implement it using JS() from Pyjamas. Not a big deal.

Conclusion

The end ? The work to do is huge. It’s possible, but not alone. So if anyone want to contribute on the Javascript translation, please contact me :)